How to Choose Shower Tile That Lasts and Looks Great
You're standing in a tile showroom with samples stacked under your arm.
October 7, 2026 · 12 min read
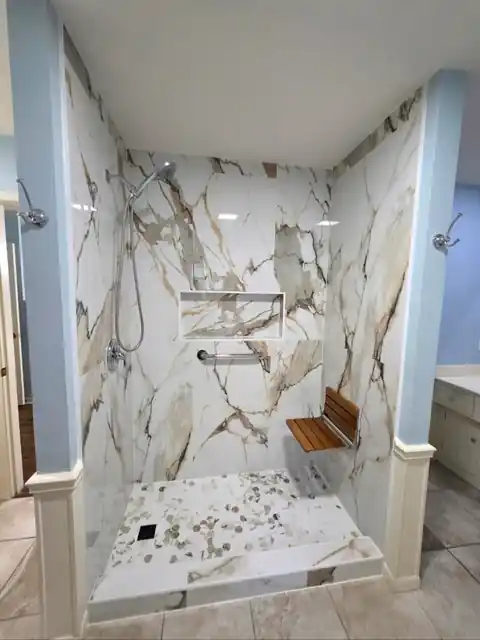
You're standing in a tile showroom with samples stacked under your arm. One salesperson is pointing out a “waterproof porcelain,” another is showing you a glossy wall tile, and the contractor hasn't yet explained what membrane will sit behind the tile or how the shower floor will drain. Every sample looks convincing under showroom lighting. None of them tells you whether the finished shower will be safe, easy to clean, or sound years from now.
Learning how to choose shower tile starts with treating tile as part of a working assembly. The floor, wall substrate, waterproofing membrane, slope, drain, grout, ventilation, and cleaning routine all affect the result. A beautiful tile installed over a poorly waterproofed shower is still a failed shower.
Why Choosing Shower Tile Is Harder Than It Looks
A homeowner can choose a beautiful tile on Monday and discover a layout problem by Friday, when the installer starts placing it around the drain, valves, niche, and curb. The sample shows color, sheen, and texture. It does not show how the product feels under bare feet, holds soap film, follows a sloped pan, or allows the installer to keep large wall surfaces flat and edges aligned.
The mistake I see most often is using one tile everywhere because the colors match. A polished porcelain may work well on a wall but create a poor floor surface. A heavily textured mosaic can improve traction while trapping residue in its recesses. Natural stone can deliver the desired appearance, but it also requires sealing, cleaning, and maintenance that many homeowners will not keep up with.
Separate the visual decision from the performance decision
Divide the shower into working zones before approving a tile order:
- Shower floor: Check wet-floor performance, barefoot comfort, drainage, texture, and whether the pieces can follow the pan without awkward cuts.
- Shower walls: Review water absorption, cleanability, edge durability, substrate flatness, and the appearance of cuts around valves and niches.
- Niches and benches: Limit grout joints, inside corners, and horizontal surfaces where water and soap can sit.
- Transitions: Resolve the curb, floor-to-wall joint, glass edge, and every change of plane before finalizing the layout.
The tile is only one part of the assembly. The membrane, slope, drain, grout, and ventilation determine how the finished shower handles water over time. A low-absorption porcelain can be a sensible wall material, and The Tile Council of North America's porcelain reference explains why product documentation matters more than a showroom label. Its classification does not make the shower waterproof. The membrane still protects the structure, while the slope and drain must move water away from the surface.
A good specification also accounts for cleaning and drying. A textured floor may offer better grip but require more scrubbing. Small mosaics can conform to a pan while adding grout joints. Large wall tiles reduce joints but demand a flatter substrate and make poor layout planning more visible.
Ventilation belongs in the tile decision. A shower that stays damp leaves residue on grout and other surfaces, so an easy-clean finish cannot correct a humidity problem. Match the tile and grout to the exhaust fan, drying time, cleaning products, and daily use, including the conditions found in humid areas such as East Texas.
Shower Floor Tile Safety and Slip Resistance
The floor deserves a different standard from the wall. Water, soap, and bare feet create a more demanding surface, and a tile that feels acceptable in a dry showroom can become uncomfortable or unsafe once the shower is running.
Wet dynamic coefficient of friction, or DCOF, is a controlled test value used to compare hard-surface flooring under wet conditions. ANSI A137.1 generally uses wet DCOF of at least 0.42 for a level interior area expected to be walked on when wet, as explained in this. That figure isn't a universal guarantee for every residential shower. Barefoot use, soap residue, drainage, texture, grout joints, and the slope of the pan all change the actual experience.
Screen the floor before you fall in love with the finish
Reject polished or visibly smooth products unless the manufacturer explicitly approves them for shower-floor use. Ask for the technical data sheet and request wet DCOF information tested under ANSI A326.3, rather than accepting “slip resistant” as a marketing description. The ANSI A326.3 reference categories from Crossville also makes clear that DCOF alone can't determine whether a tile is appropriate for a shower floor.
Small mosaics work well on many shower floors because their grout joints add texture and their smaller pieces can follow a sloped surface more easily. The trade-off is maintenance. More joints mean more grout to clean, and a very irregular surface can make a shower chair uncomfortable or complicate wheelchair movement. These non skid bathroom tile ideas are useful for comparing surface approaches, but the product's own technical data should control the final selection.
A safe floor also depends on the pan beneath the tile. Confirm that the drain location works with the tile format, that the pan slopes consistently toward the drain, and that water doesn't sit at the perimeter or around the curb. Before tile and grout cover the work, the installer should complete the specified waterproofing inspection or flood test and document the result. Grout can't correct a flat spot, a blocked drain path, or a membrane problem.
Shower Wall Tile Materials and Water Absorption
A shower wall can look perfect on installation day and still become a maintenance problem later. Wall tile has more flexibility than floor tile because it does not carry the same barefoot slip concern, but material choice still affects water exposure, cleaning, edge durability, weight, substrate demands, and long-term upkeep. Choose the tile as part of the shower assembly, not as a color-and-price decision.
Porcelain, ceramic, and natural stone
Porcelain is a dependable choice for shower walls because the industry definition ties it to water absorption of 0.5% or less, measured under ASTM C373. Lower absorption helps the tile handle repeated wetting, drying, temperature changes, and cleaning. Verify the product data sheet rather than relying only on the showroom label. TCNA's explanation of porcelain classification provides the classification details.
Ceramic can work well on shower walls when the manufacturer approves it for wet areas. Glazed ceramic is often easy to wipe clean and offers colors, shapes, and decorative finishes that may be less available in basic porcelain. Inspect the edge before choosing it. A contrasting body can make chips obvious, especially around valves, niches, and outside corners where cut pieces are exposed.
Natural stone offers variation that manufactured tile cannot fully reproduce. Marble and travertine also demand more care. Depending on the stone, sealing may be required, and acidic cleaners can etch the surface. Stone is a reasonable choice when the owner accepts that cleaning and sealing are part of the routine. It is not a low-maintenance replacement for porcelain.
Dense tile does not make a waterproof shower
“Waterproof porcelain” describes the tile, not the whole shower. Tile, grout, and caulk are the exposed wear surface. Water can pass through joints, cuts, corners, and penetrations, so the membrane and its detailing protect the wall assembly behind that finish. A dense tile cannot compensate for a failed slope, poor drainage, or neglected ventilation.
Large-format porcelain reduces visible grout and creates a quieter appearance, but it demands a flatter substrate. Wall irregularities can cause lippage, hollow spots, difficult cuts, and poor alignment around niches. Approve a mock-up showing the corner, niche edge, trim, grout color, and floor-to-wall transition before the installer tiles the entire shower.
Waterproofing the Shower Before Aesthetics
The waterproofing system sits behind the finish, so homeowners often don't pay attention until a stain, loose tile, or damp wall exposes the failure. By then, the expensive part of the shower may need to be removed. Tile and grout are the wear surface, not the structure's water barrier.
A durable shower needs a coordinated assembly that manages water from the surface to the drain. The details include the substrate, a sloped shower base, a compatible sheet or bonded liquid-applied membrane, the curb or curbless transition, corners, niches, benches, valve penetrations, and the drain connection. Cement board by itself isn't waterproof, and a membrane that stops short at a corner or penetration leaves a weak point in the system.
Ask for the details that disappear
Before tile arrives, ask the installer:
- Membrane: Which product is being used, and is it a sheet membrane or bonded liquid-applied system?
- Corners: How will inside corners, outside corners, niches, and benches be sealed?
- Penetrations: How will valve bodies, shower outlets, shelves, and fasteners be treated?
- Drain connection: How does the membrane tie into the drain without leaving a gap?
- Testing: When will the waterproofed pan be tested, and what area will the test cover?
- Transitions: How will the curb, doorway, drywall, and floor-to-wall changes of plane be handled?
Pre-formed inside corners can help avoid weak folds or openings in a sheet membrane. Proper overlap and compatible components matter at the drain and threshold. A flat, properly prepared substrate also gives the tile setter a fair chance to produce even joints and a clean large-format layout.
The Home Pro guide to retiling a shower offers a useful homeowner-oriented reference for thinking about the work sequence. The visible result should support the hidden construction: the floor should send water toward the drain, penetrations should remain sealed, and the wall should be flat enough for the selected tile.
A video can help you visualize how the layers relate, but it shouldn't replace the written installation specification or the contractor's explanation of the actual products being used.
Grout, Joint Width, and Tile Size Trade-offs
Grout is a working part of the shower, not just a color between tiles. It affects cleanability, water exposure, visual rhythm, and how forgiving the finished surface will be when the wall or floor moves slightly. The right grout depends on the tile, joint, installer, curing conditions, and maintenance expectations.
Cementitious grout remains common because installers know how to use it and it works across many tile systems. It can need more maintenance in a wet shower, especially where soap and hard-water residue collect. Epoxy can reduce porosity and improve stain resistance, but cleanup and application require discipline. Urethane products can offer a practical middle ground, though the manufacturer's instructions matter.
For a deeper look at what happens when tile and grout need cleaning or repair, this tile restoration guide from Restore Heroes provides useful maintenance context. Restoration is never as convenient as choosing a workable grout and cleaning routine before installation.
Let the tile format serve the pan
Large wall tile gives a quiet appearance with fewer visible joints. It also requires a flat substrate, careful handling, and accurate planning around niches, valves, corners, and outlets. Small floor mosaics follow a sloped pan more readily and add grout texture, but they increase the area that needs routine cleaning.
Joint width should follow the tile manufacturer's requirements and the consistency of the tile. Rectified tile can support a narrow, precise joint when the substrate and layout are controlled. Handmade or irregular tile may need a wider joint to absorb size variation. On a shower floor, the joint pattern also contributes to underfoot texture, but adding grout lines doesn't excuse selecting an unapproved floor surface.
Use contrasting grout when you want to emphasize a pattern, and use a closer color when you want the field to read as a calmer surface. Either way, mock up the combination. A grout that looks subtle beside one tile may make another tile appear uneven or busier than expected.
Spend on the grout and installation details where water works hardest. Save decorative money on areas that don't improve safety, drainage, or serviceability.
Budgeting for Shower Tile Without Surprises
A shower budget becomes easier to understand when you stop treating tile as the whole project. The visible tile is only one line in an assembly that may also include demolition, disposal, substrate repair, plumbing changes, waterproofing, setting materials, grout, trim, ventilation, glass, and finish carpentry.
A straightforward family-bath refresh may use a standard wall layout, a practical floor mosaic, limited plumbing changes, and a conventional glass enclosure. The cost pressure usually comes from demolition, hidden substrate damage, waterproofing, and the amount of cutting around the tub or shower valve. A clean, simple layout can keep the visual design attractive without creating unnecessary labor.
An aging-in-place or curbless conversion is a different project. The floor transition, drain location, slope, waterproofing continuity, wall reinforcement, shower controls, and enclosure details all need coordination. The tile selection has to support the mobility plan, not just match the vanity. A floor that is difficult for a shower chair or walker can undermine the reason for the remodel.
A custom spa shower may add multiple wall surfaces, niches, benches, accent materials, specialty fixtures, larger pieces, and more demanding layout work. Each extra plane creates another opportunity for a cut, corner, movement joint, trim detail, or waterproofing transition. The visual simplicity of a luxury shower often hides more planning, not less.
Read the bid by visible outcomes
Ask the contractor to separate the scope so you can connect each cost to work you can inspect:
- Demolition and disposal: What is being removed, and how will the room be protected?
- Substrate preparation: Will damaged framing, drywall, or backing be repaired before waterproofing?
- Waterproofing: Which membrane, drain connection, corners, niches, and testing procedures are included?
- Tile and setting: Does the allowance cover the chosen format, cuts, trim, mortar, and layout?
- Plumbing and ventilation: Are valve relocation, fixture changes, and exhaust improvements included?
- Finish work: Are grout, movement joints, glass, paint, and transitions part of the written scope?
A low tile allowance can look attractive while excluding the work that determines whether the shower lasts. The Home Pro shower remodel cost guide can help homeowners organize the questions behind a bid, but every project still needs a site-specific assessment. Existing conditions control the final scope.
Hiring a Contractor and Finalizing Your Tile Choice
The contractor should be able to explain the shower from the framing outward, not just recommend a tile color. Before approving the order, get the assembly and installation responsibilities in writing.
Questions that expose weak bids
Ask who supplies the membrane, what product will be used, how the pan slope will be checked, and when the waterproofing will be tested. Ask how the installer will treat niches, benches, curbs, pipe penetrations, and the transition to drywall. If the answers stay vague, the bid is vague too.
The contract should identify the substrate preparation, membrane product and coverage, compatible mortar, grout type, movement-joint treatment, tile layout, trim, and testing procedure. A waterproofing warranty should be distinguished from a tile or workmanship warranty. Those are related protections, but they don't describe the same failure.
Review the installer's work with the same care you give the tile sample. A contractor who can show clean niches, straight transitions, consistent joints, and well-finished floor layouts is giving you more useful evidence than a polished showroom promise. For maintenance or repair planning after installation, resources on hotel tile restoration services can also illustrate the kinds of surface problems that become expensive when routine care is ignored.
Final approval checklist
- Floor performance: Confirm wet-floor approval, tested DCOF data, barefoot comfort, drainage, and compatibility with the slope.
- Wall material: Confirm absorption classification, wet-area approval, cleanability, edge appearance, and substrate requirements.
- Waterproofing: Identify the membrane, corners, niches, penetrations, drain connection, and testing procedure.
- Grout and joints: Approve the grout type, color, joint layout, movement joints, and maintenance instructions.
- Layout: Dry-lay the floor and review cuts, drain alignment, niches, trim, and the floor-to-wall transition.
- Contract scope: Confirm materials, preparation, labor, warranties, cleanup, and changes before tile is delivered.
Homeowners preparing contractor interviews can use this questions to ask contractors checklist to keep the conversation focused on scope rather than sales language.
Pick the floor for tested wet performance first. Pick wall tile for absorption and maintenance. Specify waterproofing as a complete system, choose grout around the joint and cleaning requirements, and build the budget around the assemblies that must be installed correctly. Walk into the contractor meeting with that list, not just a tile sample.
Home Pro's Remodeling & Repairs provides design-build bathroom remodeling, including shower, tile, fixture, and ventilation work, with on-site consultations for East Texas projects. Visit Home Pro's Remodeling & Repairs to discuss your shower assembly, review tile and waterproofing decisions, and request an on-site estimate.
Home Pro's Remodeling & Repairs, (903) 920-2969
Call (903) 920-2969More articles
7 Best Outdoor Kitchens: Designs, Costs, and Build Tips
Many outdoor kitchen problems begin on day one, when the layout, cover, and utility routes get decided before anyone looks closely at the budget.
Bathroom Vent Through Wall: Complete DIY Installation Guide
You've just stepped out of the shower on a humid East Texas morning.