Kitchen Remodeling Checklist: 10 Steps for 2026
Your kitchen may look ready for new cabinets, but the decisions behind the walls can still be unsettled.
September 9, 2026 · 16 min read
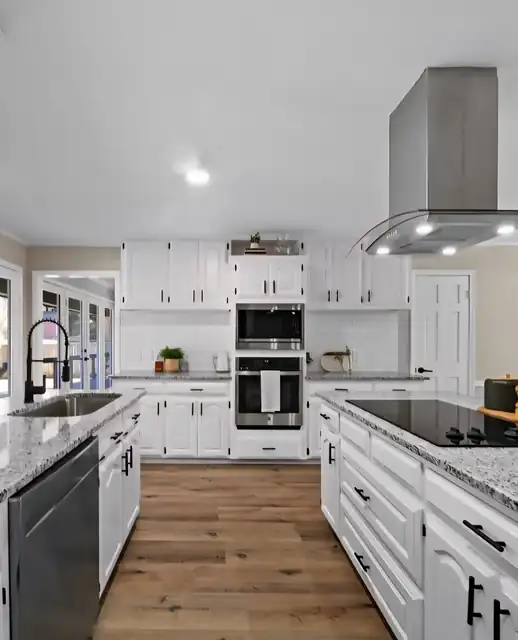
Your kitchen may look ready for new cabinets, but the decisions behind the walls can still be unsettled. If the budget hasn't been defined, the refrigerator size is still a guess, or nobody has confirmed whether moving the sink requires permits, a seemingly simple update can disrupt every later stage.
A reliable kitchen remodeling checklist follows the project in working order. It starts with scope and budget, moves through layout, materials, appliances, permits, ordering, and construction, then finishes with inspections, documentation, care, and warranty responsibilities. Use each step to record decisions, identify dependencies, and keep the homeowner, designer, contractor, cabinet supplier, electrician, plumber, and other trades aligned.
For East Texas homeowners, that sequence matters. A kitchen in Tyler, Lindale, or another nearby community may involve older utility systems, long-lead cabinetry, humid conditions, and several trades working in a tight space. The checklist below is designed to help you make the expensive decisions early, protect the decisions that follow, and recognize when a smaller refresh makes more sense than a full reconstruction.
1. Establish a Target Budget and Define Scope Before Design
Start with the maximum amount you can responsibly commit, then describe exactly what the project includes. A kitchen remodel can mean cabinet refacing and new counters, or it can involve demolition, layout changes, plumbing, electrical work, flooring, ventilation, and new appliances. Those are different projects with different risks.
The kitchen remodeling cost guide can help organize the discussion, but don't treat a broad market range as a quote for your home. The 2025 Houzz U.S. Kitchen Trends Study reported a median spend of $60,000 for major kitchen remodels and $20,000 for minor remodels, while the top 10% of major-project spenders invested $180,000 or more. For kitchens measuring 250 square feet or more, the medians rose to $72,000 for major remodels and $35,000 for minor remodels, with the top 10% spending $200,000 or more on major work, according to the 2025 Houzz kitchen trends report.
Decide what stays and what changes
Write the scope before choosing finishes. Include demolition, cabinet installation, countertops, flooring, plumbing, electrical, ventilation, permits, delivery, disposal, painting, and cleanup. List appliances separately, especially if you haven't decided whether to reuse them.
For a Tyler-area project, you might decide that storage and durable base cabinets matter more than premium appliances. Another homeowner may keep the existing layout, spend more on cabinetry and lighting, and postpone a flooring replacement. Both approaches can work if the priorities are documented.
Practical rule: If a choice isn't in the written scope, assume it hasn't been included in the project price.
Request a detailed estimate that identifies assumptions, allowances, exclusions, payment stages, and the process for approving changes. Discuss financing early if it's relevant, but don't use financing to conceal an undefined scope. A realistic target budget gives the designer and builder a boundary to work within and makes later trade-offs much easier.
2. Evaluate Kitchen Layout and Workflow
A kitchen can have attractive finishes and still feel frustrating every day. Test the route between the refrigerator, sink, range, pantry, trash, and primary preparation area before approving cabinet drawings. The traditional work triangle remains useful as a starting point, but modern kitchens often need several connected work zones for cooking, cleanup, storage, coffee preparation, and family traffic.
Start by sketching the existing room to scale. Record wall lengths, ceiling height, doors, windows, trim, vents, outlets, plumbing, gas connections, and appliance dimensions. Take photographs from several angles. A designer can work from drawings, but photographs reveal awkward corners, obstructions, uneven walls, and traffic patterns that measurements alone won't show.
Test the room as people use it
Ask who cooks, who cleans, and who passes through the kitchen while those tasks happen. A refrigerator placed beside the main walkway may be convenient for everyone, but it can also create repeated door conflicts. A sink in an island can improve interaction with family members, yet it may consume valuable uninterrupted preparation space and require new plumbing.
An island must leave enough room for walking, opening doors, and pulling out drawers. Don't approve an island because it fills an empty center. Mark the proposed footprint on the floor with tape, then open imaginary appliance doors and walk the route during a normal meal-preparation routine.
A smaller kitchen with a clear prep zone often works better than a larger kitchen where the island blocks movement.
Compare the cost of moving utilities with the benefit of the proposed change. Converting a galley kitchen to an L-shaped layout with a peninsula can improve openness and add seating, but it also changes cabinets, flooring, electrical work, and possibly plumbing. Keep changes that solve daily problems. Drop changes that only make the plan look different.
3. Select Cabinetry Style, Material, and Finish
Cabinet decisions control storage, visual character, appliance integration, countertop support, and much of the installation sequence. Choose the cabinet construction and configuration before finalizing related dimensions. A stock cabinet may simplify ordering and control cost, while semi-custom cabinetry can address unusual wall lengths or storage needs. Fully custom work offers the most flexibility, but it requires careful drawings, approvals, and coordination.
Separate appearance from performance. A painted Shaker door can suit a farmhouse-style home, while natural maple with a stain may better complement a traditional East Texas interior. Flat-panel gray doors with push-to-open hardware can create a cleaner contemporary look. Mixed storage, such as open shelving above closed base cabinets, can add display space, but open shelves also expose dishes and dust.
Put daily storage ahead of decorative upgrades
Base cabinets receive constant contact from cookware, cleaning supplies, food, and small appliances. If money is limited, prioritize durable boxes, properly supported drawers, useful corner storage, and a pantry configuration that fits how you shop. Soft-close hinges and drawer slides improve use, but they shouldn't replace a poor cabinet layout.
Ask to see door and finish samples in the actual kitchen. Warm indoor lighting, daylight, nearby flooring, and countertop colors can change how a sample appears. Review the cabinet interiors, adjustable shelves, toe-kick details, fillers, crown treatments, and finished end panels before signing off.
Confirm the supplier's delivery schedule and inspect the order promptly. Cabinet damage, missing pieces, and incorrect sizes are easier to resolve before installation begins. Have the contractor and designer use the same approved cabinet plan, appliance specifications, and revision date. That shared document prevents a cabinet supplier from working from an outdated drawing.
4. Choose Countertop Material and Surface Treatment
Countertops need to support food preparation, cleaning, appliance use, and the visual weight of the cabinets. Compare materials by maintenance, repairability, edge treatment, sink compatibility, seam placement, heat exposure, and appearance in your actual lighting. A dramatic stone may be attractive in a showroom but harder to live with if it demands more maintenance or makes repairs difficult to hide.
Quartz is often selected for a low-maintenance surface, while granite can provide natural variation and a strong visual statement. Butcher block creates warmth and can suit a farmhouse kitchen, though it requires a different care routine from engineered stone. Laminate can be a sensible choice where the goal is a controlled refresh, a rental update, or an investment property rather than a high-end finish.
The comparison of quartz and granite countertops should be part of the selection conversation, not the final decision by itself. Bring cabinet doors, flooring samples, and backsplash options when comparing slabs or large samples. Small chips rarely show the movement, pattern scale, or seam visibility that will define the finished surface.
Confirm the details before fabrication
Choose the sink, faucet, edge profile, overhangs, and appliance locations before templating. An undermount sink requires compatible countertop fabrication and cabinet support. A waterfall edge changes the amount of material and the appearance of the island. A busy pattern may require deliberate seam placement, especially around corners and sink cutouts.
Ask who completes the field measurement and who approves the final template. Confirm the cutout dimensions against the appliance and sink specifications. Countertops are fabricated after the cabinets are installed and accurately leveled, so a late cabinet change can affect the entire sequence.
Don't choose a surface solely because it photographs well. A quieter pattern may make the kitchen easier to coordinate, while a durable surface with a manageable care routine can deliver more practical value than a finish that demands constant caution.
5. Plan Flooring Type, Installation Method, and Transitions
Kitchen flooring has to tolerate spills, dropped cookware, chair movement, muddy shoes, pets, and repeated cleaning. In East Texas homes, moisture management and a sound installation base deserve as much attention as color. A material can be attractive and still fail if the subfloor moves, the underlayment is unsuitable, or water reaches an unprotected edge.
Large-format porcelain tile can reduce the number of grout joints and create a continuous appearance. Luxury vinyl plank can provide a wood look with a moisture-resistant construction and a softer feel underfoot. Sealed concrete suits a modern or industrial interior, but its finish, cracking behavior, and comfort should be discussed before installation. Each material trades appearance and maintenance against comfort, repair options, height, and installation complexity.
Plan the floor with the rest of the room
Decide whether flooring will run beneath cabinets and appliances or stop at the cabinet footprint. The answer affects future appliance removal, finished heights, toe kicks, and transitions to adjacent rooms. If the kitchen meets existing hardwood, tile, or vinyl, select the transition detail before materials arrive. A poorly planned threshold can become the most noticeable part of an otherwise good remodel.
Inspect the subfloor before finalizing the installation price. Water damage, uneven areas, weak sections, and height differences may require preparation that isn't visible in a finish schedule. Ask the installer to identify the underlayment, adhesive or mortar system, movement joints, and waterproofing approach where relevant.
For tile, discuss grout color and cleaning. A closely matched grout can create a quieter surface, while a contrasting grout emphasizes the pattern but may make discoloration more apparent. For resilient flooring, review the product's installation requirements rather than assuming every waterproof product can be installed over every existing floor.
6. Select and Plan Appliance Placement
Choose appliances early enough for the designer, cabinet supplier, electrician, plumber, and installer to work from exact specifications. Record width, height, depth, door swing, ventilation clearance, water connection, drain requirements, gas or electrical demand, and the manufacturer's required installation gaps. A refrigerator that is slightly deeper than expected can interfere with a walkway or prevent a cabinet door from opening fully.
Decide whether you want standard freestanding appliances or panel-ready models. A panel-ready refrigerator or dishwasher can blend into the cabinetry, but it introduces additional cabinet coordination and a greater need for accurate panel dimensions. A professional-style range can support serious cooking, yet it may require stronger ventilation, more electrical capacity, or a gas connection that the existing kitchen doesn't have.
Treat delivery as part of the construction schedule
Don't order an appliance package without confirming delivery access, storage, damage inspection, and installation responsibility. Measure the path from the driveway or entry to the kitchen. Check doors, stairways, flooring protection, and the final opening before delivery.
If utility modifications are needed, place them on the construction schedule rather than handling them as an afterthought. The electrician or gas engineer may need to work before drywall, while the appliance installer may require finished floors, cabinets, and countertops. Ask who removes old appliances, who connects the new ones, and who tests them.
Reuse can be the right decision when existing appliances fit the approved layout and remain reliable. Replacement makes more sense when an appliance creates a design constraint, lacks required capacity, or needs utility work that would be difficult to justify for an older unit. Make that decision before cabinets are ordered.
7. Design Lighting, Electrical Outlets, and Smart Features
Lighting should be drawn onto the kitchen plan, not added after cabinets are installed. Use separate layers for general illumination, task lighting, and accent lighting. Recessed fixtures can provide broad coverage, under-cabinet LEDs can reduce shadows on work surfaces, and pendants can define an island or peninsula. Dimmers allow the same room to support food preparation, cleanup, entertaining, and quiet evening use.
Electrical planning follows the same principle. Mark countertop outlets, island outlets, appliance circuits, under-cabinet lighting connections, hood power, refrigerator water equipment, disposal power, and charging locations. Older kitchens often need more than a cosmetic outlet replacement because modern appliances and countertop equipment place different demands on the circuit layout.
Coordinate the plan before the walls close
Give the electrician the approved cabinet elevations and appliance specifications. An outlet hidden behind a drawer bank, a switch covered by a backsplash, or a pendant centered over an island that later changes size creates avoidable rework.
Decide whether smart controls add useful convenience or unnecessary complexity. App-controlled or voice-enabled lighting can help some households, but conventional switches should remain easy for guests, children, and anyone who doesn't use the system. Choose fixtures with accessible replacement parts and document the controls for future owners.
Review GFCI protection, dedicated circuits, panel capacity, switch locations, and the final placement of junction boxes with the qualified electrician. The right outlet isn't useful if the circuit can't support the appliance, and a beautiful pendant doesn't compensate for poor task lighting over the cutting board.
8. Evaluate Ventilation Requirements and Hood Options
Ventilation affects air quality, cabinetry, wall finishes, comfort, and the long-term condition of the kitchen. Start with the range or cooktop specification, then determine whether the hood will be wall-mounted, under-cabinet, integrated, island-mounted, or connected to another approved exhaust arrangement. A ducted hood that vents outdoors generally offers a different performance profile from a recirculating unit, so don't select the hood only after the cabinets have been designed.
The duct route matters as much as the hood itself. A short, direct route usually creates fewer coordination problems than a long path with multiple bends. Confirm the exterior termination, weather protection, backdraft control, insulation needs, electrical supply, and any framing or cabinet changes. In an island, the duct may need to pass through the ceiling, which can affect structure and finished surfaces.
Match ventilation to cooking habits
A household that frequently sears, fries, grills, or uses a high-output range needs a more deliberate ventilation discussion than a household that mostly reheats food. Ask the contractor to review the manufacturer's requirements and the relationship between hood width, capture area, duct size, makeup air considerations, and operating noise.
Don't hide a weak system behind an attractive hood cover. A quiet, decorative hood that fails to capture steam and grease can leave odors on nearby surfaces. Conversely, an oversized or poorly ducted system may create noise and comfort problems. Test the selected model's controls and sound information before ordering, then place ventilation on the same coordination drawing as cabinets, lighting, and ceiling work.
9. Coordinate Permits, Inspections, and Code Compliance
Permit responsibility needs to be clear before demolition begins. Cabinet and countertop replacement may be treated differently from work that changes walls, plumbing, electrical circuits, gas lines, or exterior ventilation. A sink relocation, for example, can affect water, drainage, electrical, cabinetry, and inspection sequencing.
For project-specific guidance, review whether your kitchen remodel needs a permit with the contractor and the relevant local authority. Don't rely on a general assumption that kitchen work is either always exempt or always permitted. The scope, property location, and nature of the work determine the correct path.
Put approvals into the schedule
Ask who prepares drawings, submits applications, pays fees, responds to plan comments, and schedules inspections. Keep copies of approved plans, permit cards, inspection records, and the final completion documentation. Those records can support future maintenance, warranty questions, insurance conversations, and resale disclosures.
Coordinate inspections with the work sequence. Electrical, plumbing, framing, and ventilation work may need to be visible before walls are closed, while final inspections depend on completed fixtures and safe operation. If an inspector identifies a correction, record the issue, responsible trade, required action, and reinspection status.
Never accept “we can handle it later” as a substitute for a written permit plan. Skipping required approvals can create safety exposure and complicate later property transactions. A contractor who manages the process should explain it plainly, not make it disappear from the estimate.
10. Plan Backsplash Design, Material Selection, and Installation
Choose the backsplash after the cabinet layout and countertop direction are clear, but before the installation crew needs final material quantities. The backsplash protects walls from water, grease, and routine splashes, yet it also connects the countertop, cabinets, outlets, windows, and hood into one visible composition.
A classic white subway tile can keep a kitchen adaptable. A herringbone pattern adds movement but requires more cutting and careful alignment. Large-format porcelain can reduce grout maintenance, while glass mosaic tile can introduce color without covering the entire room in a strong pattern. The best choice depends on cooking habits, cleaning tolerance, cabinet style, counter movement, and how long you expect to live with the design.
Resolve edges, outlets, and grout early
Confirm the backsplash height and where it stops at windows, tall cabinets, open shelves, and the hood. Aligning the top edge with the underside of the cabinets often creates a cleaner result than stopping at an arbitrary point. If the backsplash will run higher or cover a full wall, update outlet extensions, switch plates, and trim details before installation.
Choose grout deliberately. Matching grout can soften a busy tile, while contrast can emphasize a pattern and make alignment more visible. Glossy tile may reflect light well but show water spots, whereas a matte surface may be easier to live with visually. Request samples beside the actual countertop and cabinet door, not in isolation.
The tile installer should use an appropriate backing and waterproofing method for the location. Confirm the layout before setting begins, especially around outlets and corners. A few minutes spent dry-laying the pattern can prevent a narrow, awkward cut from becoming the first thing you notice.
10-Point Kitchen Remodel Comparison
Close the Loop Before You Call It Complete
A kitchen isn't complete when the last cabinet door is hung. It's complete when the approved plans, installed materials, systems, documentation, and remaining corrections have all been checked against the agreement. Schedule a final walkthrough with the contractor and use the signed scope, finish schedule, appliance list, cabinet drawings, electrical plan, and permit records as your reference.
Test the room instead of looking at it. Run each appliance through its basic operation, confirm the dishwasher drains, check refrigerator water connections where applicable, operate the disposal, test outlets and switches, adjust dimmers, and verify that under-cabinet lights illuminate the work surface. Turn on the hood and check capture, noise, exterior discharge, and any signs of vibration or backdrafting.
Open every cabinet and drawer. Check alignment, clearances, hardware, shelf adjustment, finished panels, fillers, toe kicks, and interior damage. Inspect countertop seams, sink edges, faucet connections, overhangs, backsplash alignment, grout, caulk, paint touch-ups, flooring transitions, and trim. Small defects are easier to correct before final sign-off than after the crew has left and materials have been returned.
Use a written punch list
A verbal conversation at the island isn't enough. Record each issue with a description, photograph, location, responsible person or trade, required correction, and agreed completion date. Include incomplete items as well as damaged or poorly finished work. Separate safety or water-related issues from cosmetic touch-ups so urgent corrections receive immediate attention.
Closeout standard: Don't sign off on work you haven't tested, documented, or matched to the approved scope.
After corrections are completed, conduct another walkthrough. Confirm that the responsible trade has finished the work, that the repair hasn't created a new problem, and that the area is clean and usable. Keep a final change-order record so the closing balance reflects approved work rather than informal promises.
Build a kitchen project file
Keep permits, inspection results, receipts, invoices, product names, model numbers, finish samples, care instructions, warranty documents, and contractor contact details in one digital and physical location. Photograph shutoff valves, electrical panels, appliance connections, and concealed access points before they disappear behind finished surfaces.
That file helps with future maintenance and warranty service. It also gives a future homeowner or property manager a reliable record of what was installed and how it should be maintained. If you later add storage, replace an appliance, repair a leak, or sell the home, the information will be easier to find.
A coordinated design-build contractor can reduce the handoff problems between design approvals, material ordering, trade scheduling, inspections, and closeout. Home Pro's Remodeling & Repairs provides kitchen remodeling, onsite consultations, free estimates, financing options, and service support for installed products and workmanship in Tyler and surrounding East Texas communities. Those services don't remove the homeowner's responsibility to review decisions, but they can provide a single coordination point for a project with many moving parts.
The strongest checklist is a living project record. Update it when a cabinet changes, an appliance is substituted, a permit comment alters the plan, or a finish becomes unavailable. At every decision, ask what downstream work it affects, who needs to approve it, and whether the budget and schedule still support it. That habit keeps a kitchen remodel practical from the first sketch through the final warranty call.
Home Pro's Remodeling & Repairs offers design-build kitchen remodeling for East Texas homeowners, including layout updates, cabinets, countertops, flooring, backsplashes, and lighting coordination. Visit Home Pro's Remodeling & Repairs to request an onsite consultation or free estimate and discuss your kitchen remodeling checklist, scope, schedule, and available financing options.
Home Pro's Remodeling & Repairs, (903) 920-2969
Call (903) 920-2969More articles
7 Best Outdoor Kitchens: Designs, Costs, and Build Tips
Many outdoor kitchen problems begin on day one, when the layout, cover, and utility routes get decided before anyone looks closely at the budget.
Bathroom Vent Through Wall: Complete DIY Installation Guide
You've just stepped out of the shower on a humid East Texas morning.