10 Master Bathroom Shower Tile Ideas for 2026
Tile is one of the largest visual surfaces in a master bathroom, but it's also part of the room's moisture-control system.
October 5, 2026 · 17 min read
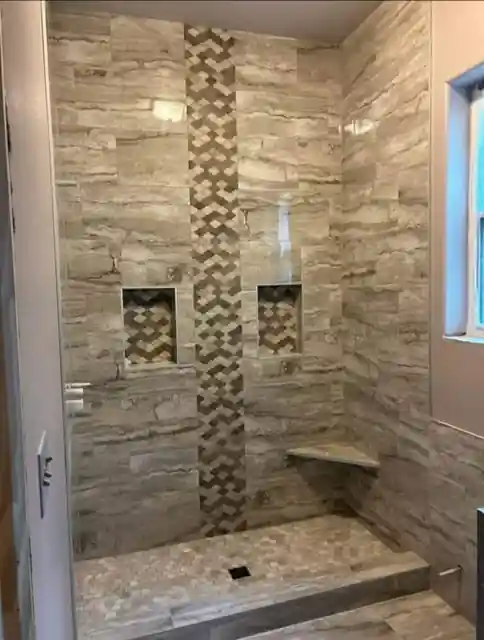
Tile is one of the largest visual surfaces in a master bathroom, but it's also part of the room's moisture-control system. A beautiful tile can still fail as a shower finish if the substrate moves, the grout demands constant attention, the floor becomes slippery, or the lighting makes every uneven joint visible. The strongest designs coordinate tile format, layout, grout, lighting, niches, flooring, fixtures, drainage, and waterproofing from the beginning.
That practical focus matters in a market where tile remains a major renovation material. The global tiles, sanitary ware, and bathroom accessories market was valued at $267.8 billion in 2025 and is projected to reach $392.5 billion by 2034, with ceramic tile representing the largest product category at 38.5% of global share in 2025, according to market data on tiles and bathroom accessories. For homeowners, that scale translates into broad design choice, but also a need to choose intelligently.
These master bathroom shower tile ideas compare more than appearance. Each one considers grout maintenance, moisture performance, lighting, installation complexity, and budget. If you're updating a walk-in shower in Tyler, remodeling near Lindale, or planning a larger East Texas renovation, use the list to separate a tile you admire from a shower you'll enjoy living with.
1. Large Format Porcelain Tiles 12x24 or Larger
Large-format porcelain creates a calm, continuous wall with fewer grout joints competing for attention. A marble-look beige porcelain can support a transitional bathroom, concrete-look gray can sharpen an industrial-modern space, and wood-look porcelain can add warmth without introducing actual wood into a wet area.
The clean appearance is especially effective in a spacious walk-in shower. Fewer joints also mean fewer narrow channels where soap residue and mineral deposits can collect. That doesn't make the surface maintenance-free, though. The remaining joints, corners, niche edges, and changes in plane still need careful detailing.
Where large format works best
Use large tiles on the main shower walls, then change scale on the floor for traction and drainage. A large wall field paired with a small-format mosaic shower floor gives the room visual restraint while allowing the floor to follow the slope toward the drain. A smooth polished finish that looks elegant on a wall can be a poor choice underfoot.
Large porcelain also exposes installation problems. Walls must be flat and properly prepared, and the layout should be drawn before the first tile is set. A poorly planned layout can leave thin slivers beside the valve wall or force awkward cuts around a niche. For a detailed look at the preparation involved, review this guide to how to retile a shower.
Practical rule: Large tile reduces visible grout, but it increases the importance of substrate preparation, handling, alignment, and edge planning.
The tile itself may also affect the budget. Independent 2026 estimates place a tiled shower at roughly $18 to $60 per square foot installed, with typical projects around $2,700 total. Ceramic or standard subway tile commonly falls around $12 to $25 per square foot installed, while large-format porcelain typically runs about $18 to $35 per square foot installed, according to installed bathroom tile shower cost estimates. Ask for a waste and repair allowance before ordering, and keep spare tile from the same batch when possible.
Here's a visual example of the effect:
Large-format porcelain is a strong choice when you want a modern field, restrained grout, and a finish that can coordinate with a vanity, bench, or freestanding tub.
2. Subway Tile Variations With Modern Grout
Subway tile earns its place through flexibility. A standard rectangular tile can look traditional with a warm cream tone, paired with matching gray grout, or sharply contemporary with a dark contrasting joint. The same basic material can support several bathroom styles without forcing the rest of the room into a narrow design category.
The layout makes the larger difference. A straight running bond feels familiar and economical. A stacked horizontal installation looks cleaner and more architectural, while herringbone introduces movement and increases cutting and alignment work. Chevron creates a continuous V-shaped rhythm, but the factory-cut geometry and precise meeting points demand more attention than ordinary subway installation.
Houzz reports that horizontal stacked shower wall tile reached 18%, up 5 percentage points year over year, while horizontal brick remained the top choice at 31% and vertical stack reached 20% in its bathroom trends study. The same study found that 61% of renovating homeowners preferred small shower-floor tile, even though that share declined by 4 percentage points. These figures appear in the 2025 U.S. Houzz Bathroom Trends Study, and they highlight a useful distinction. A wall can carry a crisp, low-joint layout while the floor uses smaller pieces for slope and grip.
Make the grout part of the design
White subway with black grout creates a graphic effect, but every variation in joint width becomes more visible. Matching grout softens the field and usually makes the installation easier to live with visually. In a daily-use shower, choose grout based on both appearance and cleaning expectations, then use flexible caulk at inside corners and changes of plane rather than rigid grout.
A pale gray subway tile in herringbone with a similar gray grout is a safer choice for homeowners who want pattern without excessive contrast. Cream tile with warm grout works well beside natural wood cabinetry, brass fixtures, and softer lighting. Matte black subway tile can be dramatic, but it needs a deliberate lighting plan so the shower doesn't feel enclosed.
For a timeless pattern with more movement, explore this. The best layout is the one that respects the shower's width, niche position, valve locations, and edge conditions rather than just copying a showroom wall.
3. Hexagonal and Geometric Tile Patterns
Geometric tile adds personality without requiring a vivid color palette. Soft gray hexagons can create a quiet honeycomb texture, while black and white pieces produce a stronger architectural contrast. Penny rounds, octagons with square dots, elongated hexagons, and other shaped mosaics can make a niche or feature wall feel custom even when the main walls remain simple.
Use geometry selectively. A full shower covered in a small, high-contrast pattern can become visually busy, especially when the room also contains a vanity, decorative lighting, patterned flooring, and several fixture finishes. A geometric back wall framed by larger porcelain is usually easier to coordinate and easier to repair than a pattern carried across every surface.
Balance visual interest with grout
Small pieces create more grout than large-format tile. That extra joint area can emphasize the pattern, but it also increases cleaning responsibility. Epoxy grout may be appropriate where stain resistance is a priority, provided the installer is experienced with the product and the selected tile. Mesh-backed mosaics simplify handling, but the sheets still need to be checked for visible repeating seams and consistent spacing.
A soft gray hexagon wall paired with a plain gray floor creates movement without introducing a second focal point. A black-and-white mosaic can work inside a recessed niche, where its scale feels intentional instead of overwhelming. A brushed bronze penny round can echo warm hardware, but test the combination under the actual bathroom lighting before committing.
A geometric tile should have a job. Use it to define a wall, frame a niche, support the room's proportions, or connect the shower to another material.
Before installation, lay out the sheets dry and mark the centerline of the wall. Check how the pattern meets corners, benches, shelves, and plumbing trim. If the pattern begins with an awkward partial shape at the edge, move the layout before mortar makes the decision permanent.
4. Marble and Natural Stone Tiles
Natural stone gives a shower genuine variation that manufactured surfaces can only imitate. Carrara marble brings white and gray veining, travertine adds warm movement, slate introduces depth, and limestone can create a subdued, architectural backdrop. A stone shower often feels less repetitive because each piece has its own color and pattern.
That character comes with more responsibility. Marble, travertine, limestone, and other porous stones need a sealer suited to the specific material and bathroom use. They also require compatible cleaning products. Acidic cleaners can damage sensitive stone, so a pH-neutral stone soap is the safer routine choice. Sealing helps protect the surface, but it doesn't turn natural stone into a zero-maintenance finish.
Treat the shower as a wet assembly
Stone selection should happen alongside waterproofing, drainage, slope, niche construction, and bench design. A penetrating sealer belongs on the stone, while the waterproofing membrane belongs behind the tile assembly. Those functions aren't interchangeable. If water reaches the substrate because the shower system was poorly detailed, a premium stone surface won't correct the problem.
For the floor, favor a finish with appropriate slip resistance and enough small-piece flexibility to follow the slope. Honed surfaces generally reduce glare compared with polished stone, which can help under strong recessed lighting. Dark slate can create a polished room, but it may show soap residue or lighter deposits more readily than a softly varied neutral tile.
A homeowner comparing real stone with a stone-look porcelain should include maintenance in the budget, not just material cost. This tile shower remodel cost guide can help frame the broader project conversation, particularly when waterproofing, demolition, new fixtures, or a bench are part of the scope.
Natural stone works best when its variation is intentional. Order samples, inspect full pieces where possible, and decide whether the veining should run horizontally, vertically, or in a book-matched composition. A rushed installation can make an expensive material look random rather than refined.
5. Glass and Glass Mosaic Tiles
Glass brings light into a shower through reflection, translucency, and color depth. Clear glass tile supports a minimalist room, frosted surfaces create a softer glow, and iridescent blue or green mosaics can shift as daylight and fixture lighting move across the wall. In a darker bathroom, a carefully placed glass accent can keep the shower from feeling flat.
Glass is particularly effective in a niche, vertical stripe, or back wall. Covering every surface in a reflective mosaic may create too much visual activity and can make water spotting more noticeable. A restrained band of blue-green glass beside warm white porcelain often delivers more lasting appeal than a full room of high-contrast shimmer.
Plan the light and the cleaning routine
Glass tile is non-porous, but its appearance still depends on installation and upkeep. Water spots, soap residue, and mineral deposits can remain visible on reflective surfaces, especially under direct lighting. A squeegee-friendly shower design, effective ventilation, and a cleaning routine will protect the luminous effect.
The setting material and grout color deserve testing. A neutral grout usually lets the glass color lead, while a contrasting grout emphasizes every mosaic joint. Epoxy grout can be considered where stain resistance is important, but its application requires a qualified installer and careful cleanup.
Pair iridescent glass with warm metal fixtures if the room needs balance. Pair clear or pale glass with darker hardware when you want the fixtures to provide the contrast. In either case, install waterproofing behind the tile according to the selected shower system, and don't treat the glass surface as the waterproof barrier.
6. Wood-Look Porcelain Tiles
Wood-look porcelain gives a shower the warmth of oak, walnut, ash, or teak without bringing natural wood into a constantly wet environment. It can soften a contemporary room with concrete-look walls or reinforce a spa direction alongside stone, greenery, and warm metal fixtures. Light oak supports an airy bathroom, while walnut and dark ash create a more enveloping atmosphere.
The most convincing installations respect the visual language of wood. Select planks with varied grain and avoid a pattern that repeats obviously from sheet to sheet. Offset joints with intention, but don't use a layout that creates narrow pieces around the perimeter or awkward interruptions at niches and benches.
Use the material where it reads naturally
A wood-look wall can be a strong feature behind the shower controls or bench. On the floor, choose a product with a finish appropriate for wet-foot traffic and confirm that the tile is rated for the intended application. A realistic wood image doesn't automatically mean the surface has the traction or texture needed for a sloped shower floor.
Grout affects the illusion. A close-toned grout minimizes the visual interruption between planks, while a contrasting joint makes each piece look more like a separate board. Coordinate the tile with the vanity or trim, but don't match every wood tone in the room exactly. One dominant warm element and one restrained supporting material usually looks more intentional.
Installation note: Wood-look porcelain still needs a properly prepared substrate, a complete waterproofing system, and careful slope work. Its wood appearance doesn't change the requirements of a shower.
A Tyler homeowner might use light oak-look porcelain on the shower's main wall, matte gray porcelain on the floor, and a small stone mosaic in the niche. That combination creates warmth without asking a high-maintenance material to perform where it shouldn't.
7. Terrazzo and Aggregate Tiles
Terrazzo and terrazzo-look tile add a speckled surface that can act as both color and texture. The chips may be subtle gray and white, warm multicolor fragments, black and white aggregate, or jewel-like pieces of glass and stone. Because the pattern distributes visual variation across the surface, terrazzo can hide minor day-to-day residue better than a completely uniform dark tile.
Modern porcelain versions are often the practical choice for a shower. They deliver the aggregate appearance with a more predictable manufactured surface and can be used as a full wall treatment or a targeted feature. Traditional terrazzo and natural aggregate products may require different sealing and care, so confirm the manufacturer's installation instructions before mixing materials.
Keep the surrounding surfaces quieter
Terrazzo already contains visual information. Pairing it with a plain matte porcelain, simple fixtures, and restrained grout gives the pattern room to work. A speckled gray wall with a solid gray floor can feel modern and calm. A colorful aggregate feature wall should usually be supported by neutral walls and a simple vanity rather than competing with patterned cabinetry or busy flooring.
Tile-to-tile variation matters. Inspect multiple cartons, identify the intended direction of the pattern, and document the installation plan before setting begins. A feature surface may look balanced in the showroom but become uneven if the installer places the strongest clusters beside one another.
Use terrazzo in a niche or on the wall opposite the shower entry if you want a controlled focal point. On the floor, select a finish with suitable traction and verify that the small chips don't create an uncomfortable surface underfoot. The right product can make the shower feel custom, but the wrong scale can make a compact room feel crowded.
8. Matte Black and Dark Tile Installations
Dark tile creates drama quickly. Matte black subway tile can make brass fixtures stand out, charcoal large-format porcelain can give a shower a hotel-inspired finish, and slate-gray surfaces can connect a contemporary bathroom to natural textures. Matte surfaces reduce glare, which can make the room feel calmer than a glossy black installation.
Dark tile also changes the lighting equation. A small shower with dark walls, a dark ceiling, and weak overhead lighting can feel enclosed. Use a layered plan that includes appropriate ceiling illumination, vanity lighting outside the shower, and enough reflected light from mirrors or pale surrounding surfaces.
Control contrast instead of adding darkness everywhere
A black accent wall is often more forgiving than a fully black enclosure. Pair it with a light floor, pale bench, white stone-look wall, or reflective glass panel. White or light grout defines a subway pattern, while matching grout creates a quieter slab-like effect. Test both options under the room's actual lighting because grout can change the perceived scale of the tile.
Dark colors may reduce the visibility of some water deposits, but they won't eliminate cleaning. Mineral residue, soap film, and streaks can still show, especially on matte textures. Strong ventilation and a surface that can be wiped easily matter more than color alone.
A practical scenario is a large East Texas primary bathroom with a dark charcoal back wall, warm white side walls, a light mosaic floor, and aged brass fixtures. The dark surface supplies the focal point, while the lighter materials keep the shower open and make the finish easier to evaluate in changing daylight.
9. Watercolor, Ombre, and Gradient Tile Designs
Watercolor and gradient tiles bring an artistic quality to the shower without relying on a separate framed print or decorative wall. A blue-to-white transition can suggest water and sky, a soft green ombre can echo foliage, and a gray gradient can add depth without introducing a strong pattern. These surfaces are most successful when the color shift has room to read.
Use the design as a feature rather than covering every available wall. A gradient back wall can draw attention through the shower entry, while solid porcelain on the return walls keeps the room composed. In a smaller shower, a vertical installation can visually emphasize height. In a wide shower, a horizontal transition may reinforce the room's proportions.
Treat placement as part of the artwork
Document the order and orientation of each tile or mosaic sheet before installation. The intended transition can disappear if boxes are mixed randomly or if the strongest color lands behind a niche, valve trim, or bench. A full mockup, even a simple wall sketch with numbered pieces, can prevent expensive corrections.
Lighting determines how the colors appear. Cool light may make blue and green feel sharper, while warmer light can soften beige, taupe, and rose tones. Review samples under the proposed shower lighting and beside the selected grout, metal fixtures, countertop, and flooring.
Because the wall already carries movement, use simple complementary materials. A solid matte floor, plain niche interior, and understated hardware let the gradient remain the focal point. If the tile is a printed large format, inspect the transition between panels. If it is a mosaic, check that the mesh seams won't create visible horizontal or vertical breaks.
10. Combination Tile With Complementary Materials and Finishes
Combining materials can produce the most personalized shower, but it also creates the most coordination work. A large-format base with a mosaic niche, stone floor with subway walls, wood-look porcelain with a geometric accent, or concrete-look tile with a narrow glass feature can balance budget and visual impact. Premium material can be concentrated where the eye naturally lands instead of covering every surface.
The combination should feel designed, not accumulated. Establish one dominant tile, one supporting material, and an accent that has a clear relationship to the room. The commonly used 60/30/10 proportion can be a helpful design framework, but it isn't a construction rule. What matters is that the materials share a color family, align at intentional transitions, and suit the shower's scale.
Coordinate the details before ordering
A visual mockup should show the niche, bench, curb, valve wall, shower floor, lighting, and fixture finish. Confirm that each selected product is compatible with the waterproofing system and intended wet-area use. Different tile thicknesses may require transition planning, and polished, matte, textured, and natural stone surfaces may need different cleaning routines.
The most reliable combinations often contrast scale rather than color. For example, warm white large-format porcelain can cover the walls, a small neutral mosaic can slope across the floor, and a narrow glass accent can sit inside the niche. The room gains depth without forcing every material to compete.
Use this guide to shower curb tile ideas when the curb, floor, and wall materials need to meet cleanly. A curb is a small element with high visibility, so its top, outside face, waterproofing transitions, and grout lines deserve the same planning as the main wall.
10-Item Comparison: Master Bathroom Shower Tile Ideas
Turn Inspiration Into a Buildable Shower Plan
The right choice among these master bathroom shower tile ideas depends less on a trend label and more on how the tile will behave in your room. Start by selecting the dominant tile, usually the surface that covers the largest wall area. Large-format porcelain, calm subway tile, natural stone, or a restrained terrazzo can establish the room's direction before you add any accent.
Choose an accent only when it supports the architecture. A mosaic can emphasize a niche, a glass strip can connect the shower to the vanity, and a geometric back wall can draw the eye toward the shower. If the accent competes with the floor, countertop, cabinetry, and fixtures, remove it. A simpler composition often looks more expensive because each material has room to register.
Then evaluate performance. Confirm the shower-floor tile has an appropriate slip-resistant finish and can be installed over the required slope. Ask how the grout will be cleaned, whether the selected natural stone needs sealing, and how the finish will look under both daylight and artificial lighting. A sample board with tile, grout, metal finish, paint, and countertop material can expose conflicts before installation.
Waterproofing and substrate preparation should be approved before tile is ordered. The tile is the visible finish, but the shower depends on the concealed assembly behind it. Niches, benches, curbs, corners, valves, drains, and changes in plane all require detailed coordination. A design-build process helps keep those decisions connected instead of leaving the designer, tile installer, plumber, and homeowner to solve them separately on site.
For homeowners in Tyler and nearby East Texas communities, an onsite consultation can make the decision more practical. Home Pro's Remodeling & Repairs handles bathroom remodeling that includes showers, tile, and fixtures, and its design-build process connects planning, budget, material selection, scheduling, and construction. That approach is particularly useful when the project includes multiple tile formats, a custom niche, a bench, new ventilation, plumbing changes, or a complete bathroom reconfiguration.
Before signing off on the design, confirm the target budget and production schedule, identify who is responsible for ordering and storing tile, and retain spare material for future repairs. Ask for the installation sequence so the shower isn't treated as a decorative finish added after every other decision has been made. A good plan also accounts for door swing, shower entry, lighting access, cleaning reach, and the way the finished floor meets the bathroom floor.
The most successful shower isn't necessarily the one with the rarest tile or the busiest pattern. It's the one where the material, grout, layout, drainage, waterproofing, lighting, and budget support the way your household uses the room. A beautiful tile concept performs best when design, scheduling, and installation are coordinated from the start.
Home Pro's Remodeling & Repairs offers bathroom remodeling for homeowners planning shower, tile, fixture, and layout updates across Tyler and East Texas. Visit Home Pro's Remodeling & Repairs to request an onsite consultation or free estimate for a shower design that needs coordinated material selection, waterproofing, and installation.
Home Pro's Remodeling & Repairs, (903) 920-2969
Call (903) 920-2969More articles
7 Best Outdoor Kitchens: Designs, Costs, and Build Tips
Many outdoor kitchen problems begin on day one, when the layout, cover, and utility routes get decided before anyone looks closely at the budget.
Bathroom Vent Through Wall: Complete DIY Installation Guide
You've just stepped out of the shower on a humid East Texas morning.