Room Addition Plans That Actually Get Built
You're standing in the backyard with a measuring tape in one hand and a growing list of household problems in the other.
October 2, 2026 · 14 min read
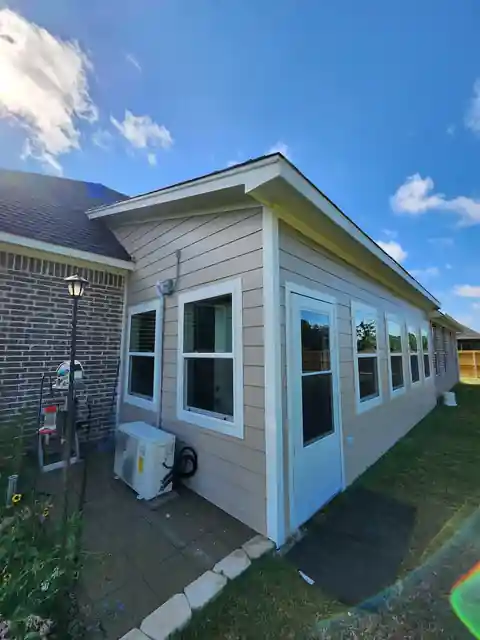
You're standing in the backyard with a measuring tape in one hand and a growing list of household problems in the other. The children need more room, the only bathroom is always occupied, and the shaded part of the yard looks like the obvious place for an addition. Then the practical questions arrive: Will the new space fit beside the oak trees? Can the existing foundation carry another story? What happens to the roof, HVAC, drainage, and monthly payment?
Good room addition plans answer those questions before anyone orders materials. The first sketch matters, but the decisions made before the sketch matter more. A project that starts with a defined program, a realistic budget, and a verified site can move cleanly from concept to permit. A project that starts with a wish list often stalls when the first serious estimate comes back.
Starting With the Decision Most Homeowners Skip
A Tyler-area homeowner with two growing children and one bathroom may naturally begin with a primary suite addition. Standing under a backyard oak canopy, though, they have more than a layout decision to make. A first-floor suite over a new slab could solve the bedroom problem, but it could also consume the most usable part of the yard, require new utility runs, and create a roof tie-in that changes the project's cost.
The decision most homeowners postpone is agreeing on what the household can realistically fund. That number should exist before detailed drafting begins. A designer can draw a beautiful suite at almost any size, but drawings don't tell you whether the finished project fits the payment, available cash, or financing plan.
Start with three kitchen-table checks.
- Define the program: Write down what the addition must accomplish. A primary bedroom, bathroom, closet, laundry connection, and private entry form a very different project from a bedroom with a small bathroom.
- Set the financial boundary: Decide what monthly payment or total project amount the household can absorb without relying on optimistic assumptions. Include room for a contingency, because site conditions and existing-house tie-ins can change the estimate.
- Name the existing rooms that must change: A new suite may require a hallway relocation, a larger electrical service, a revised HVAC layout, or a new exterior door. If those changes aren't listed early, they tend to appear later as expensive additions to the scope.
Practical rule: Draw the budget boundary before you draw the exterior wall.
Those answers steer the rest of the project. A tight budget may favor a compact bump-out or a conversion over a new foundation. A requirement for privacy may rule out placing the new bedroom beside the family room. A shaded yard may make drainage, daylight, tree protection, and foundation design more important than the homeowner expected.
The aim isn't to eliminate ambition. It's to size the ambition so the project can reach framing instead of stopping after the second revision. A realistic program gives the designer something useful to solve, and a realistic budget prevents the plan from becoming a collection of choices nobody can afford.
The Main Types of Room Additions and When Each One Fits
A room addition is new conditioned space connected to the existing house, usually with structural, roofing, electrical, plumbing, and mechanical implications. The right form depends on the lot and the program. Homeowners often choose a style first, then discover that setbacks, foundation conditions, or circulation make it impractical.
Six common paths
A first-floor footprint addition extends the home into the yard. It usually offers the most direct access and the simplest daily circulation, especially for a primary suite or expanded kitchen. The trade-off is land consumption, new foundation work, drainage planning, and a roof connection that must look intentional.
A second-story addition creates living area without extending the footprint. It can preserve a small yard, but the existing house must be checked carefully. The foundation, bearing walls, beams, floor framing, stairs, and roof structure may need reinforcement before the new level is possible.
An over-garage addition uses the garage area below as a structural starting point. It can work well for a bedroom, office, or guest suite, but it often needs a new stair route, taller walls, sound control, and careful verification of the garage slab and supporting structure. The location may be efficient, but the structural and circulation details aren't simple.
A bump-out adds a modest projection for a larger kitchen, bathroom, dining area, or closet. It can solve a specific spatial problem without rebuilding the entire floor plan. Small additions often lose construction efficiency because foundation, roofing, utilities, and exterior finishes still have to be coordinated across a limited area.
A basement addition or conversion depends entirely on the existing house and site. In areas where homes are built on slabs, there may be no basement to finish. A home with an existing below-grade or pier-and-beam configuration may offer more options, but moisture control, egress, insulation, and stairs still require professional review.
A conversion repurposes an existing garage, attic, porch, or other underused area. It can avoid some new foundation and exterior-wall work, but the existing shell may not meet requirements for insulation, ceiling height, emergency escape, moisture protection, or heating and cooling.
The lot should choose the typology, not a catalog image. Check setbacks, lot coverage, easements, parking, access, drainage, height, stairs, egress, and fire separation before becoming attached to one layout.
What a Real Room Addition Actually Costs to Plan
A bedroom addition may look like a simple box on paper. The budget changes once that box needs a foundation, roof connection, heating and cooling, electrical service, finished flooring, and a clean tie-in to the existing house. Early estimates are useful only when they reflect the work required to make the new room function as part of the home.
Industry estimates place many additions around $80 to $210 per square foot, while higher-cost markets can reach $300 to $600 or more per square foot. The same HomeAdvisor's room-addition cost guide cites a national average around $51,000, common project totals from about $22,000 to $83,000, and labor at 40% to 60% of the total.
Use those figures for early planning, not as a guaranteed quote. A bathroom or kitchen usually costs more to build than a bedroom because it adds plumbing, ventilation, cabinets, fixtures, and finish work. A second-story addition may require structural reinforcement, while a basement project can involve moisture control, stairs, and below-grade construction. A long run to the electrical panel, plumbing connection, or HVAC equipment can also raise the total.
Why the square-foot number misleads
Square-foot pricing hides fixed work. A small addition may still need a survey, demolition, foundation, framing, weatherproofing, utility extensions, inspections, and exterior repairs. A larger rectangle can cost less per square foot than a compact room with several corners, plumbing fixtures, and multiple roof intersections.
Key cost drivers include:
- Site and foundation conditions: Expansive soil, limited access, drainage corrections, or difficult excavation can change the foundation design and construction scope.
- Roof and exterior matching: Brick, siding, windows, flashing, and roof geometry may require custom transitions instead of standard materials.
- Mechanical distance: Longer routes from the air handler, electrical panel, or plumbing connection require more material, labor, and concealment.
- Service capacity: A full electrical panel or limited HVAC capacity may require upgrades before the new room is comfortable and code-compliant.
- Program complexity: A bedroom, bathroom, and kitchen carry different fixture, ventilation, cabinet, and utility requirements.
Build the early estimate in separate categories: base construction, design and engineering, permits, utility work, site restoration, finish selections, and contingency. Confirm whether it includes the work needed to connect the addition to the existing house. A box may fit the budget, while a finished, conditioned, inspected room does not.
For a local planning reference, compare the assumptions in Home Pro's home addition cost guide with your proposed scope. The useful question is whether the estimate identifies the site and connection conditions that could change the final cost.
What Goes Into a Set of Room Addition Plans
A permit-ready set is much more than a floor sketch. Municipal guidance commonly calls for a plot or site plan, foundation plan, floor plan, roof plan, elevations, framing information, structural calculations, and trade drawings where electrical, plumbing, or mechanical work changes. The City of St. Charles room-addition requirements illustrates the level of documentation reviewers may need.
What each drawing answers
The existing and demolition plans establish what is already there and what will be removed. Without them, the reviewer can't tell whether a wall is load-bearing, whether a window is being altered, or how the new work affects the current circulation.
The site plan places the addition on the property. It should show property lines, setbacks, existing structures, easements where known, access, and the proposed footprint. This sheet often exposes an impossible concept before the homeowner pays for detailed engineering.
The floor plans show room labels, dimensions, doors, windows, stairs, cabinetry, plumbing fixtures, and circulation. A plan drawn only for furniture placement isn't enough. The reviewer needs to understand how the new space connects to the existing house and whether the rooms meet life-safety requirements.
The elevations and roof plan explain the exterior. They show height, window alignment, siding or masonry transitions, roof slopes, flashing zones, and the point where old and new meet. Poorly resolved roof connections are a common source of water risk and change orders.
The sections and structural details cut through the building so the reviewer can see the foundation, floor, wall, insulation, ceiling, and roof connection. Structural sheets identify headers, beams, posts, joists, rafters, and other members required to carry loads safely.
Finally, electrical, plumbing, mechanical, and energy notes show how the new space will function. A municipal room-addition handbook from Temecula explains that conditioned additions may require insulation information, an energy compliance calculation, and HVAC sizing documentation. A room addition has to be comfortable and serviceable, not merely large enough on paper.
Permits, Reviews, and Inspections in Plain English
Permitting isn't paperwork saved for the final week. It's a parallel workstream that starts with the property and continues through construction. Room additions are generally regulated as structural new construction because they change the home's footprint, framing, roof, and utility connections. A room-addition permitting guide notes that a typical package can involve building, electrical, plumbing, mechanical, and sometimes grading approvals.
The approval path
First, confirm the jurisdiction and zoning constraints. The relevant office may be the city, an extraterritorial jurisdiction, or a county department, depending on the property. Ask about setbacks, lot coverage, height, easements, parking, drainage, and whether the proposed addition triggers plan-exam review.
Next, check the HOA or architectural committee if the property has deed restrictions. An HOA may review roof pitch, exterior materials, window placement, colors, or visibility from the street. That approval is separate from the public building permit.
The formal permit package then goes through plan review. Reviewers compare the drawings with adopted building, electrical, plumbing, mechanical, energy, and life-safety requirements. Corrections aren't necessarily a sign that the design is poor. They are a normal part of making incomplete or ambiguous details specific enough for approval.
During construction, inspections verify the work before it gets covered:
- Foundation inspection: Footings, reinforcement, forms, and related site conditions are checked before concrete or concealment.
- Framing inspection: The structure, connections, openings, and roof work are reviewed.
- Rough trade inspections: Plumbing, electrical, and mechanical systems are inspected before walls close.
- Insulation and drywall checks: Energy and fire-related work must be visible at the appropriate stage.
- Final inspection: The finished addition is checked for completion and compliance.
The permitting guide notes that plan review can often take 4 to 10 weeks, and permit fees commonly range from $500 to $3,000, depending on valuation and jurisdiction. It also notes that many jurisdictions require at least six inspections across the project. Those figures make one point clear: approval time can matter as much as the field schedule.
A contractor should tell you who schedules each inspection, what must remain exposed, and what happens if an inspector requests a correction. For a closer look at coordination between approvals, trades, and field work, review this project management process for additions.
How the Design-Build Process Keeps the Project on Track
The design-build advantage is more than having one company answer the phone. It's putting cost, design, engineering, permitting, and construction decisions in an order that reduces avoidable redesign.
Four decisions in sequence
First, agree on the target budget. The builder and homeowner define the number before detailed drafting, then test the desired program against the realistic cost range for that addition type. If the budget can't support a large footprint, the team can reduce size, simplify the roof, move plumbing, or evaluate a conversion before the drawings become expensive to change.
Second, develop the concept. The team settles the footprint, room relationships, entry points, windows, exterior character, and connection to the existing house. The homeowner should be able to understand what the addition does before paying for detailed structural and trade documentation.
Third, produce construction documents. The approved concept becomes the coordinated plan set. Structural details, energy information, electrical layouts, HVAC distribution, plumbing, elevations, and permit forms must agree with one another. A floor plan that shows a window where the elevation shows a wall creates a review problem and a field problem.
Fourth, build and inspect. The same team coordinates estimating, scheduling, subcontractors, material decisions, and inspections. That doesn't remove every surprise, but it gives the project one chain of responsibility when a beam, duct, or roof transition affects several trades at once.
Skipping the first step creates budget drift. Skipping concept decisions creates redesign loops. Skipping coordination creates change orders. Skipping inspection planning creates delays when work is covered before approval.
The homeowner also has a communication job. Agree on who can approve changes, how decisions are documented, when updates arrive, and what requires a written change order. These contractor communication tips from CS1 Real Interiors are useful beyond their original market because clear decisions protect both sides of an addition project.
A local team offering a design-build contractor process should be able to show how the budget, drawings, permit submission, production schedule, and field supervision connect. The target budget belongs at the beginning, not after the first set of plans has already exceeded it.
When a Room Addition Is the Wrong Answer
A house can feel too small without needing more square footage. Sometimes the problem is a poorly arranged hallway, an oversized formal room, an isolated kitchen, or an underused garage. Adding onto the house before testing those conditions can create a costly solution to a planning problem.
Compare the alternatives honestly
Reconfiguration may work when the existing envelope already contains the needed area. Removing or moving a nonstructural partition, combining rooms, or borrowing space from an oversized area can improve daily use without adding a foundation or roof.
Conversion makes sense when a garage, attic, porch, basement, or carport has useful volume. The existing shell can reduce some exterior work, but the space still needs review for insulation, moisture, egress, ceiling height, utilities, and heating or cooling.
A detached structure can separate a quiet office, workshop, studio, or guest function from the main house. It may preserve the existing floor plan and provide better site flexibility, but zoning, utility connections, access, and permitting still have to be checked.
Moving to another home deserves a place in the comparison. If the addition would consume the best outdoor space, require major structural work, and still leave the family with an awkward layout, buying a house that already fits may be the more coherent financial decision.
If the existing envelope already contains the square footage you need, adding more is usually the wrong first move.
The comparison should include more than construction price. Consider the lot, foundation, mechanical capacity, expected time in the home, disruption during construction, resale priorities, and all-in cost per usable square foot. An addition fixes the family to one location on the lot and creates a continuous connection between old and new. A conversion or detached structure may offer a different balance of cost, privacy, and flexibility.
For another practical perspective on overlooked constraints, see these. The useful question isn't “Can we add a room?” It's “Which change solves the household problem with the fewest compromises?”
The First Calls to Make Before You Draw Anything
The first call shouldn't always be to a contractor. Before a drawing has value, four conversations need clear answers.
Start inside the household
Write a one-page brief describing what the new space must do, who will use it, how long the family expects to stay, and which existing rooms can change. Separate requirements from preferences. “A private bathroom” is a requirement for one household. “A vaulted ceiling” may be a preference that disappears if the roof connection becomes difficult.
Then speak with a lender or financial planner. Clarify whether the project would use cash, a home equity product, or construction financing. Ask how the lender handles staged payments, appraisal, documentation, and a reserve for unexpected work. A contractor can estimate construction, but the financing structure belongs in the household's financial plan.
The next call is to the local building or development services office. Confirm jurisdiction, setbacks, lot coverage, easements, height limits, utility availability, grading concerns, and the approvals required for the proposed work. Don't assume a large backyard means a large buildable area.
Finally, contact the HOA or architectural review committee where one applies. Ask for submission requirements, exterior restrictions, roof and window rules, review meetings, and the documents needed before a public permit application.
These calls act as gates. A setback may eliminate the preferred footprint. A lot-coverage limit may force a second-story study. A full electrical service may change the budget. An HOA rule may rule out the siding or roof form that made the first sketch appealing.
Bring the answers to the first design meeting:
- Program: Rooms, functions, and existing areas affected.
- Site: Lot constraints, access, trees, easements, and likely addition location.
- Money: Target budget, financing approach, and reserve.
- Approval: Jurisdiction, HOA status, and known review requirements.
That one-page summary lets the designer start with real constraints instead of assumptions. It also gives the contractor a fair basis for discussing whether the project should be a footprint addition, a vertical expansion, a conversion, a reconfiguration, or something else.
Home Pro's Remodeling & Repairs offers design-build room additions, master suites, home offices, sunrooms, and expanded living spaces for homeowners in Tyler and surrounding East Texas communities. Visit Home Pro's Remodeling & Repairs to request an onsite consultation and begin with a target budget, site review, and practical plan for moving from the first sketch to construction.
Home Pro's Remodeling & Repairs, (903) 920-2969
Call (903) 920-2969More articles
7 Best Outdoor Kitchens: Designs, Costs, and Build Tips
Many outdoor kitchen problems begin on day one, when the layout, cover, and utility routes get decided before anyone looks closely at the budget.
Bathroom Vent Through Wall: Complete DIY Installation Guide
You've just stepped out of the shower on a humid East Texas morning.