8 Tile Shower Curb Ideas for a Better Remodel
A shower curb is one of the smallest elements in a bathroom, yet it controls the entry, manages runoff, affects accessibility, and becomes one of the most visible tile details in the room.
August 17, 2026 · 15 min read
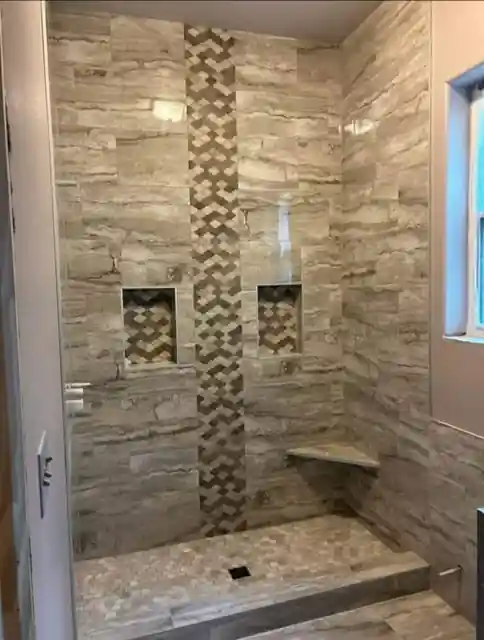
A shower curb is one of the smallest elements in a bathroom, yet it controls the entry, manages runoff, affects accessibility, and becomes one of the most visible tile details in the room. The best tile shower curb ideas start with that responsibility, not with a finish board or a picture from a showroom.
A successful curb coordinates the shower layout, drain position, floor slope, waterproofing, tile or stone, edge treatment, maintenance, and installation skill. In an East Texas remodel, the right choice also depends on whether the project is a straightforward replacement, an aging-in-place update, or a larger floor-plan change. These eight approaches range from a linear-drain threshold and beveled accent curb to integrated seating, natural stone, mosaics, floating profiles, curved entries, and storage.
Start with performance: Resolve drainage, slope, substrate, and waterproofing before choosing the decorative curb details.
The International Residential Code guidance summarized in this shower curb planning guide treats the curb as a water-retention component, not merely a trim piece. That principle also applies when planning a zero entry shower installation, where the threshold may disappear visually but the waterproof transition still has to work.
1. Linear Drain Curb with Slope Design
A linear drain can make the shower threshold read as part of the architecture. Set it along the back wall or near the entry, then coordinate the curb, glass line, tile joints, and access route around that location. Large-format porcelain, narrow grout joints, and a frameless enclosure reinforce the clean geometry, while the drain position determines how water and tile cuts are managed.
The floor still needs a consistent 1/4 inch per foot, approximately a 2% grade, directed toward the drain. Tile cannot correct a flat substrate or a poorly formed plane. The waterproofing layer must support the same drainage path, and the curb top should shed water back into the shower rather than toward the bathroom. For the applicable code and installation guidance, see the IRC and TCNA shower curb guidance.
Where the design earns its place
This profile suits a modern Tyler primary bath, a spa-influenced renovation, or an East Texas remodel where a continuous horizontal line supports the room's design. It can also work in an accessible layout, provided the framing, drain assembly, entry, enclosure, and waterproofing are planned as one system. A linear drain may reduce awkward tile cuts in some configurations, but its long edge makes uneven slope and alignment errors easy to see.
Specify a waterproofing system such as Schluter KERDI or another approved membrane, and require the installer to show how it will connect to the drain assembly. Large tiles create fewer grout joints, yet they require a flatter substrate and precise slope transitions. The curb finish also affects upkeep. Porcelain is generally forgiving, while stone needs attention to sealing and runoff behavior.
Specification tip: Set the drain location before ordering tile. Draw the drain, curb, glass line, slope, and grout layout together.
Choose this system when the contractor has direct experience with bonded waterproofing and linear drains. Avoid it when the drain is selected late or the installer cannot explain how the floor will shed water without a low spot.
2. Beveled Edge Curb with Accent Tile
A beveled curb gives a traditional shower a more deliberate finish. Instead of leaving the threshold as a blunt rectangular block, the installer softens or angles the exposed edges, then uses an accent tile to frame the entry. Slate, marble-look porcelain, metallic mosaics, or earth-toned trim can connect the curb to the floor and wall palette without making the entire shower busy.
This approach works well in older East Texas homes where a classic or transitional bathroom fits the architecture better than a stark minimalist installation. A neutral field tile on the walls and floor can make a darker curb accent feel intentional. A cottage-style bathroom may benefit from a narrow decorative border, while a larger primary bath can support a more substantial stone or porcelain cap.
Make the accent earn its place
Choose the accent after reviewing the floor, wall, vanity, and hardware finishes together. A curb that introduces an unrelated color often looks detached, especially because it sits at eye level near the glass edge. Bullnose or purpose-made finishing trim can protect the outside corner and create a polished transition, but mitered tile edges may produce a more continuous contemporary look when the installer can execute them accurately.
Beveled surfaces still need correct slope. Horizontal curb surfaces should direct water back toward the shower, and the waterproofing layer beneath the finish must follow that slope. Guidance on waterproofing a shower curb emphasizes continuous membrane coverage across the top, both sides, and the ends because the curb is exposed on multiple faces.
- Accent coordination: Match the curb to at least one established room finish.
- Edge safety: Avoid an exposed sharp outside corner beside the entry.
- Grout selection: A quality grout matters, and epoxy grout may reduce absorption and cleaning concerns where the installer is experienced with its use.
The design succeeds when the bevel improves both the silhouette and the water-shedding geometry. It doesn't succeed when decorative tile hides a flat top, an unprotected edge, or a membrane transition that was never properly sealed.
3. Wet Room Curb with Integrated Seating
A wet-room curb with integrated seating should be designed as one coordinated assembly. The seat can provide a place to sit, a bathing ledge, or storage for products, while the curb establishes the entry profile and visual boundary. Framing, structural support, waterproofing, slope, tile layout, drainage, and edge treatment must be resolved before installation begins.
This approach suits spa-style primary bathrooms in Tyler, comfort-focused renovations, and aging-in-place work where a stable seat has practical value. In a larger wet room, its strong horizontal line can give the shower a deliberate architectural presence. The trade-off is reduced floor area and more inside corners, which increase cleaning demands and leave less room for generous drainage paths.
Coordinate comfort with water control
Set the seat height and depth for its intended user, not as a shallow ledge added to the curb. A deeper surface improves comfort but can interfere with the glass line, entry swing, spray direction, or usable standing area. Mock up those clearances before framing, especially in a compact East Texas bathroom where every inch affects accessibility and daily use.
The top should slope toward the shower so water does not remain against the front edge or wall joint. Textured, slip-conscious tile is a safer choice than polished tile when the surface is wet. A rounded front edge improves comfort and reduces the impact of a hard corner, though a custom trim piece or fabricated edge can raise installation demands and cost.
The vapor barrier installation guidance applies when the seat forms part of the wet-area assembly. Confirm the waterproofing method, compatible boards and membranes, and the connection between the seat, walls, floor, and curb. The water-control layer should remain continuous, with penetrations planned rather than improvised.
Keep the seat easy to wipe by limiting unnecessary grout joints and avoiding recessed details that collect soap or mineral residue. A well-proportioned seat makes the curb feel purposeful. A poorly proportioned one makes the shower cramped, complicates maintenance, and can weaken the intended accessibility benefit.
4. Natural Stone Curb with Waterfall Edge
Natural stone makes the curb read like furniture or millwork rather than a tiled transition. Granite, slate, marble, and other slabs can create a broad cap with a waterfall edge that carries the material down the exposed side. In a luxury Tyler bathroom, that detail can connect the shower to a stone vanity top, a slab accent wall, or a restrained resort-style palette.
The visual reward comes from continuity. A single stone selection can reduce the number of competing grout joints and give the threshold a strong horizontal presence. The performance risk comes from assuming that a beautiful slab is automatically a durable shower material. Porous or softer stone can show etching, staining, mineral deposits, or wear more readily than a dense porcelain surface.
Choose stone for the room's maintenance habits
Granite and slate generally offer a more forgiving starting point than softer stones, while marble and travertine require more careful product selection, sealing, cleaning, and daily attention. The stone fabricator needs the curb dimensions, edge profile, support conditions, and waterproofing details before cutting the piece. A heavy cap must sit on a stable, properly supported assembly. It shouldn't bridge an uncertain substrate or rely on caulk to compensate for movement.
Use a penetrating sealer appropriate for the specific stone, and follow the manufacturer's care instructions. Sealing doesn't make a porous stone maintenance-free, and it doesn't replace a membrane beneath the curb. The shower remodel cost planning resource can help frame the broader scope, especially when custom fabrication, demolition, substrate repair, and finish coordination are involved.
A stone waterfall edge is a finish decision, but its success depends on support, slope, membrane continuity, and the installer's ability to protect the stone during setting.
For a practical East Texas bathroom, specify the stone only after confirming cleaning expectations. Natural stone is a strong fit for a design-led remodel where the owner accepts maintenance. It's less suitable for a rental, a heavily used family bath, or anyone who wants the appearance of stone with minimal care.
5. Mosaic Tile Curb Design
Mosaic tile turns a narrow curb into a deliberate design feature, but the pattern must work with the curb's slope, waterproofing, glass alignment, and cleaning demands. Geometric bands, glass accents, and small-format porcelain can support Mediterranean, Southwestern, transitional, or highly personal rooms. In an East Texas remodel, choose the mosaic with humidity, frequent cleaning, and the existing floor and wall palette in mind.
Scale controls the result. A motif that looks balanced on a sample board can become crowded across a shallow curb once grout joints, edge pieces, end returns, and glass are included. Dry-lay the complete assembly at full size before installation. Check the pattern at the outside viewing angle, confirm that it wraps cleanly at both ends, and make sure the curb top can retain a consistent back-slope toward the shower.
Keep the field controlled. Wet-area-rated glazed ceramic, porcelain, or glass pieces are suitable when their adhesive and grout systems are compatible. Epoxy grout can reduce absorption and resist staining, although it demands accurate mixing, disciplined working time, and thorough cleanup. Residue left on glass or textured tile can remain visibly hazy.
- Pattern scale: Use a motif that stays readable from outside the shower.
- Color balance: Repeat one or two colors already present in the room.
- Edge planning: Select bullnose, metal trim, a slab cap, or a miter before cuts begin.
- Water control: Form the top with a back-slope, fully pack the joints, and preserve membrane continuity beneath the finish.
A mosaic curb suits a quiet bathroom where the threshold can provide the strongest accent. It also fits a renovation that already requires careful tile sequencing, but replacing the visible tile should not conceal a failed substrate or waterproofing system. Homeowners weighing repair against replacement can review instructions for how to retile a shower before deciding whether the existing assembly can remain.
6. Floating or Undermount Curb System
A floating or undermount curb creates a thin, uninterrupted line beneath the glass or wall tile. The visual goal is to make the curb appear supported by the architecture rather than sitting as a separate tiled box. Metal trim, a slim stone cap, large-format tile, or a carefully recessed edge can produce that effect in a contemporary bathroom.
This is one of the least forgiving tile shower curb ideas because minimalism exposes every alignment error. A slight change in plane can make the glass line look uneven. A poorly supported cap may move, crack grout, or stress the enclosure. The substrate must be stable, the waterproofing must remain continuous, and the trim system must be selected before tile sizes and glass dimensions are finalized.
Treat the trim as part of the assembly
Products from established manufacturers such as Schluter can provide defined edge conditions, but a branded trim doesn't correct inadequate framing or an interrupted membrane. Match the trim finish to the shower hardware, faucet, towel bars, and other visible metals. Brushed finishes, matte black, and polished metals each produce a different visual weight, so choose them as part of the room rather than as a last-minute cover for a cut edge.
The accessible shower remodel instructions are useful background when the floating appearance is being considered alongside a low-threshold or barrier-free entry. The appearance may be slim, but the underlying floor buildup and water-control plan still determine whether the shower performs.
A floating curb works best in a new or extensively reconstructed bathroom where the floor, walls, drain, glass, and tile can be coordinated from the start. It's a risky retrofit when the existing floor cannot provide the required support or when the installer has limited experience with recessed trim and large-format tile.
7. Curved or Radius Curb Design
A curved curb replaces the hard 90-degree entry with a softer radius. The curve can guide the eye toward the shower, reduce the visual heaviness of a raised threshold, and remove a sharp outside corner from a family bathroom. In a sculptural contemporary remodel, it can also become the feature that separates the room from a standard rectangular shower.
The enclosure has to follow the geometry. A straight glass panel placed against a curved curb can create awkward gaps, unusable corners, or an improvised seal. Confirm the radius, glass strategy, door swing, and drain direction before the substrate is built. Subtle curves are easier to frame and tile than dramatic ones, while custom glass and curved edge pieces may require earlier ordering.
Keep the curve buildable
The substrate should follow a continuous radius without flat spots. The curb top must maintain its slope toward the shower along the entire curve, not just at the center. That becomes harder as the shape gets tighter, so the installer should verify the finished plane before tile or stone is applied.
Bullnose tile, flexible trim, custom porcelain pieces, or a fabricated stone cap can finish the edge. Each option changes the look and the number of joints. Small mosaics may follow a curve more readily, but they add grout maintenance. A slab can look cleaner, but it needs accurate templating and stable support.
This design suits a homeowner who values safety-conscious edge treatment and an organic profile more than a simple installation sequence. It's less appropriate when the bathroom is small, the budget is tightly controlled, or replacement parts and future repairs need to remain straightforward.
Practical rule: Draw the curb, glass, door swing, drain, and tile joints at full scale before approving a radius.
For East Texas remodeling, ask the contractor how the curved substrate will be waterproofed at the ends and how the selected finish will be repaired if a piece is damaged. A graceful curve is worthwhile only when its maintenance and replacement strategy is clear.
8. Tile-Over Curb with Integrated Storage or Niche
A tile-over curb can support storage, but the waterproofing plan must lead the design. A shallow ledge, open shelf, or niche beside the curb uses space that might otherwise be lost to glass, plumbing, or the door. In a compact East Texas bathroom, that can reduce clutter without adding a freestanding caddy to the shower floor.
Coordinate the storage with the curb rather than treating it as an afterthought. Continue the curb tile into the niche, cap the shelf with a matching slab, or add a small accent mosaic inside the opening. These choices affect more than appearance. Larger shelf pieces reduce grout cleaning, while mosaic surfaces offer detail but create more joints to maintain.
Detail the waterproofing before framing
Every horizontal niche surface needs a slight slope toward the shower so water cannot pool. The waterproofing system must cover the back, sides, top, bottom, and all transitions around the opening. Confirm the cavity depth against the products it will hold, then check framing and plumbing before construction. A deeper niche may reduce shower clearance or force changes to the wall layout.
Keep bottles outside the strongest spray path where the configuration permits. Align the niche with the curb, wall tile joints, or another architectural feature so the opening looks intentional. Do not cut framing or weaken the curb to create storage without an approved structural and waterproofing detail.
For a spa-style master bath, this approach can make storage feel built in. For accessibility, keep shelf heights reachable and avoid creating sharp edges at the entry. It suits small remodels when the wall assembly can be planned early, but it is a poor shortcut for concealing products in a location the installer cannot waterproof continuously.
Set the niche, membrane, wallboard, curb slope, and tile sequence before installation begins. Late changes often produce awkward cuts, extra penetrations, and repair work. Ask the contractor how the niche will drain, how the curb will shed water toward the shower, and how damaged tile or grout will be replaced.
8-Point Tile Shower Curb Comparison
Turn Inspiration Into a Waterproof Specification
Choosing among these tile shower curb ideas starts with the entry, not the finish. Decide whether the shower needs a conventional curb, a low threshold, or a curbless transition, then establish the drain position, floor buildup, glass line, and waterproofing method. Conventional curbs remain useful because they help contain water and may require fewer floor modifications. Curbless designs can support easier entry and a more open appearance, but older homes and second-floor bathrooms may need significant framing and drainage planning.
Accessibility makes the threshold decision more important. In accessible applications, the shower entrance is often limited to 1/2 inch maximum, while some roll-in applications use very small slopes of 1/8 inch or 3/16 inch per foot, as summarized in critical curbless shower planning guidance. Conventional residential curbs are often around 3 to 6 inches high, so the difference between a standard curb and an accessible entry isn't a minor style adjustment. It can change the floor assembly, drain strategy, glass design, and project scope.
Curbless showers have also become a significant remodeling preference. A 2026 summary of the 2025 U.S. Houzz Bathroom Trends Study reports low-curb showers in 52% of upgrades, curbless showers in 28%, and wet rooms in about one in six renovated baths. Those figures are cited in this, but popularity shouldn't replace a site-specific feasibility review.
Use this selection sequence:
- Choose the entry first: Match the threshold to mobility needs, water containment, room size, and long-term plans.
- Coordinate drainage: Confirm the drain location and the required floor slope before selecting tile size or pattern.
- Select the finish: Use slip-conscious surfaces where feet or seating will be wet, and evaluate natural stone for maintenance before approving it.
- Specify the assembly: Confirm substrate support, continuous membrane coverage, back-slope, edge treatment, sealants, grout, and movement joints with the installer.
- Resolve details early: Draw storage, seating, glass, trim, curb ends, and tile transitions before demolition or fabrication.
For a minimalist remodel, a linear drain or floating profile can provide the cleanest visual language. A natural stone waterfall edge belongs in a luxury design with a realistic maintenance plan. Mosaics suit artistic and transitional rooms, while curved profiles can soften a safety-focused family bath. Integrated seating supports comfort and aging in place, and curb storage helps space-conscious homeowners, provided neither feature compromises waterproofing.
Homeowners planning a Tyler or East Texas bathroom renovation can use Home Pro's Remodeling & Repairs for an on-site consultation, a free onsite estimate, design-build coordination, and a target-budget discussion before construction. That early conversation should address the existing floor structure, drain placement, tile or stone selection, waterproofing system, glass, ventilation, and the finished curb profile together.
Home Pro's Remodeling & Repairs provides design-build bathroom remodeling, shower and tile work, on-site consultations, free onsite estimates, and construction coordination for homeowners across Tyler and East Texas. Visit Home Pro's Remodeling & Repairs to discuss your shower curb design, review the existing space, and plan a waterproof specification before installation begins.
Home Pro's Remodeling & Repairs, (903) 920-2969
Call (903) 920-2969More articles
7 Best Outdoor Kitchens: Designs, Costs, and Build Tips
Many outdoor kitchen problems begin on day one, when the layout, cover, and utility routes get decided before anyone looks closely at the budget.
Bathroom Vent Through Wall: Complete DIY Installation Guide
You've just stepped out of the shower on a humid East Texas morning.